Search This Blog

Saturday 20 March 2010

Photos by Chris Jackson

Friend and bee guru Chris Jackson took these photos between 27th Feb and 1st March and send them to me for publication in the next BeeSoc newsletter.

I have his permission to share them, and accompanying words, with you.

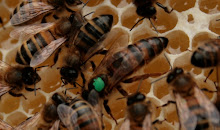
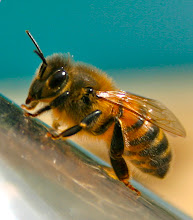
Note pollen basket - a.m.m foraging on Sarcococca, aka Sweet Box or Christmas Box.

The bees will go mad for Christmas Box. The fragrance is delicious and sometimes can be overpowering at times. Available from most garden centres and should be in every beekeepers garden.

It is evergreen, compact, pest-free, with shiny black berries holding on for 9 months of the year and then between January and March the delicate white flowers are wonderfully fragrant.

Tough as old boots and will take any amount of wind, rain, snow and frost.

The pollen basket or corbicula is part of the tibia on the hind legs


Honey bee hovers approaching Snowdrops while she transfers some more pollen.

Sunday 14 March 2010

Gave them a feed today

I was worried about the late spring.  The willow is not flowering yet and the only pollen around is crocuses.

So I have given them some Feedbee.

I've not used it before - so I'll have to wait and see.  If the manufacturer's claims are correct, the bees will soon be walking on water and flying faster than a speeding bullet.

It's a very fine powder - as you might expect, if a bee has to ingest it - that you mix with 50/50 sugar syrup.

I have only two rapid feeders, so I made a batch that was runny enough to put in a feeder.  The other two hives I made a slurry of it and put it onto greaseproof paper on the top bars.  Sorry I have no photos.

I'll report back on how the bees are getting on with it.

Lovely warm 10-12 degrees Celsius  and bees were out and about - so they need something to keep them going in the absence of any flowers. 

Friday 5 March 2010

Four out of four STILL alive

A lovely sunny day today, so I biked the seven mile round trip to my out apiaries.

Flying bees at all three hives. Some had bright yellow pollen from (probably) crocus.

I checked their food when I did the (late) Varroa oxalic acid treatment a few weeks ago. There seemed to be a lot of fondant and ivy honey stored, so I didn't feed.

I'm really relieved. There is still a chance that their numbers will dwindle before they can get on will raising this year's brood.

The catkins are getting ready to flower - so pollen should be along very soon.

I've never used a substitute for pollen - I need to learn more about it.

Wednesday 3 March 2010

Polyhive 6: Analysis

I bought the hive mail order from Modern Beekeeping for just over £100.

Good points:
  • very, very simple to put together
  • very, very light
  • very helpful vendor when I had a query
  • very cheap
  • a large brood frame (Nationals brood frames are often not big enough to accommodate a prolific queen)
  • they will never, ever, rot (but cedar frames will last 50 years if treated right)
Bad points:
  • doesn't come with a feeder in the pack, you need to buy that extra. I missed that point and have now ordered one (c. £16)
  • not very green - wood is so much more carbon-right
  • the frames are Langstroth size (common in Northern Europe, where this hive comes from) so that means a new stock of foundation and frames
  • the frames need wiring, which was not emphasised on the website. So I now need to buy more tools and components (About £20) to put wire into the frames.
Moot points:
  • will mice and rats gnaw them?
  • will woodpeckers peck them?
  • will cleaning with Caustic Soda satisfy the Bee Inspector if he/she finds EFB or AFB? Or will you have to burn them? No-one seems to know.
Who would use these? Good for:
  • high-volume beefarmer
  • people with back problems.
Not so good for:
  • a traditional-looking hive
  • being "natural".
Will they be good for the bees?

They are used all over northern europe and the reasons are obvious: they are warm and dry. The makers claim that the Queen will lay right across the frame because the edges are not cold.

Polyhive 5: Frames and QX

The plastic queen excluder sits neatly in the recess.


The purpose of the shaped plastic edges is clear when you put a frame into the box.

Polyhive 4: materials

The material is polystyrene. Like the packing in a TV set, but much harder.

The floor (below) is in one piece. The addition of the open mesh floor is trivial - four screws attach it.

A small sheet of correx (left sticking out, below, for purposes of photograph) makes the varroa floor.

It is recyclable (Number 6) - but that's not a huge concern because I expect it to last 10 years.

Polyhive 3: Construction

Two tools were needed: a small paintbrush to apply the glue and a screwdriver to put in four screws to retain the varroa floor.

It couldn't have been easier. I think (but not sure) that it would be possible to put in the sides upside down - but you would have to be pretty careless. I can easily be that dumb, but not on this occasion.

The sides fix together with interlocking mortice and tenon joints.

The top and bottom edges of the short sides are re-inforced with hard plastic edges. Easy to slide on.


Verdict: this is so easy, even a klutz like me can do it.

Polyhive 2: Finished but unpainted.

Here is the finished hive, before painting.


Not that pretty.

There is a strap (like a car roof strap) that goes around the whole thing to keep it all together. Essential, given how light it is.

Polyhive 1: Finished article

I'm posting these in reverse order so that you, dear reader, can read them sequentially (hope that makes sense).

I finished the hive with one coat of masonry paint and then an artistic rendering of camouflage.

The masonry paint in breathable and flexible - so less likely to crack and flake off than, say, gloss or emulsion.


These are "tester" pots. I still have some left in the pots - so it goes a long way, on top of the white masonry paint anyway.
So here is the finished article. Not too pretty - but I think it will blend into the landscape better than arctic white! I'll post some pics when it's in situ.