Search This Blog

Thursday 13 September 2012

Steam cleaning a polynuc

I made the feeding hole in the top of a polynuc a bit bigger and poked in the steam hose.  See below.
There is some tinfoil in the bottom of the hive, to catch the dross. I poked a hole in the foil to allow the wax to run out through the mesh floor onto the correx sheet below (just visible).

Very good results!  See the dross left behind below.


So I like this very simple and clean way of rendering wax out of old frames.

Saturday 8 September 2012

Wax extraction by steam

Here are the results of my new toy - a wallpaper steamer that serves as a steam-maker for a makeshift wax extractor.

Here's the problem. When a hive dies (like several of mine have this rotten summer), you have the issue of what to do with the frames.

Leave them in the shed?  They will get attached by wax moth (see blog entries passim).

Cut out the comb and dispose?  A waste of wax (and I need a supply for waxing plastic frames - see other blog entries passim).

Put all the comb in an old pair of tights and boil to remove the wax?  Very messy, not very effective, and almost certain to promote domestic disharmony.

Put into a solar wax extractor?  Cost to much, takes too long, and anyway, what bleedin' sun in this soddin' rainy island?

So my solution is below.


£22 from B&Q. Fill with 5L of water and switch on.

The wallpaper steaming plate (not shown) can be put aside until Mrs Novice has a redecorating hormone surge (thankfully not too frequent).

Place the broodbox, complete with frames to be steamed, onto a mesh floor (to catch most of the rubbish that falls out of the frames), with baking foil below that to catch the wax.

On the roof, I placed a polystyrene tile (as used in roof insulation) with a hole in the middle.  Insert the end of the steam hose through the hole.  Weigh the roof down with bricks.

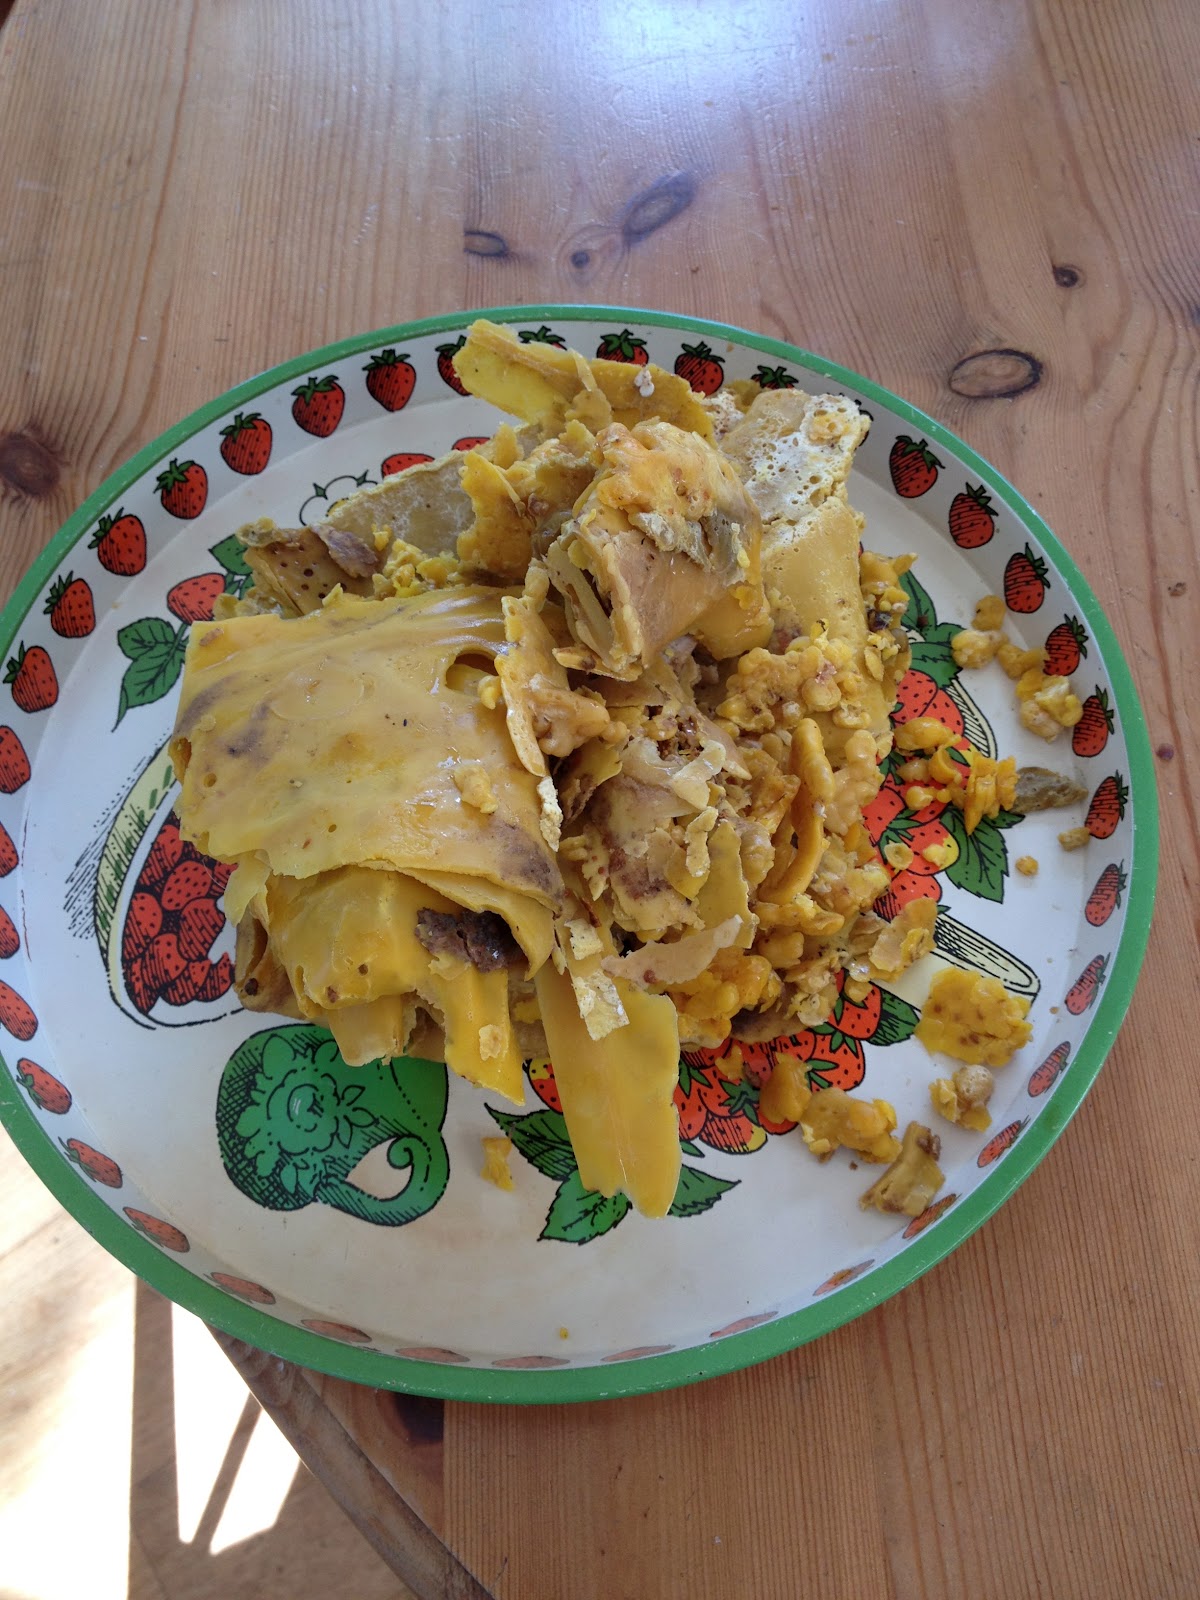
In 90 minutes, the result is shown below.


Frames with just the larval cases remaining.  All the wax has melted out, see photo below.


The result was 660g of clean(ish) wax, artfully displayed on a tea tray in photo below.


It needs to be cleaned up for sale, but for waxing plastic frames, it's good enough.

Wax extractors from Thorne's are £550. 

Review of Plastic Frames

I have used plastic frames (from Modern Beekeeping) for the last couple of years, on one hive, as a trial.  Here are the results.

Good things.
Easy to prepare.  Just melt some wax, get a paint roller (a small one!), roll in the hot wax, roll onto the frame.  All the while supporting the frame from underneath.

Easy to clean.  Just scrape 'em down, steam them off, and start again.

Bees like them.  See photo below.


You can see that brood has been laid from side to side (see previous entries on the blog).
Remember, this is a Langstroth hive, so that's a lorra lorra bees.

Bad things

They warp.  See photo below.


Where this frame has warped, the concave side has encouraged the bees to make brace comb.  On the convex side (pictured), the frame is not drawn out into comb, because it is too close the next frame.  The bees will always keep at least one beespace between frames (more at the bottom than the top, so that two bees can work back-to-back in the wider places).

They also warp banana-style, along the length, which makes it harder to get them all back in place in the hive after an inspection.

Conclusion

I won't be using them again until I can find a solution to this warping problem.  Pity, because they have a lot going for them.


Wednesday 22 August 2012

Wax moth

This is nature's way of cleaning up dead colonies.  Send in the wax moth!
If it weren't for the wax moth (Galleria mellonella) the world would be full of comb - there is nothing else that eats it, except for the odd desperate mouse.

Sorry that this photo is out-of-focus.  I should have removed my hood to take it.

This hive went queenless, despite my best efforts, and eventually all the bees died of old age. 
Then the wax moth moves in.  The larvae eat their way through the larval cases that the bees hatched from, leaving a disgusting mess of silk and faeces.
You can see the larval cases of the moth on top of the frames here.

Thursday 12 July 2012

Nice swarm, taken with aplomb

My lovely near-neighbours called me to collect the swarm that issued from their chimney (as it does every year) and what a whopper it was!

Luckily it was hanging from a thin twig that I could cut above the swarm, and then walk the swarm down the ladder.


And then lower them gently into the new hive, provided by another near-neighbour, who is keeping bees for the first time.  Lucky her!  


Followed by a much-deserved round of applause (but I affected a show of modesty).


The easiest swarm I have ever collected.

Thanks to my son Tom for the excellent photos.

Thursday 21 June 2012

The punch method of getting queen cells

Regular reader and commenter Joan asked what I used to punch the grafts.

It's a bit of 12mm steel tube (that's half and inch if you live in a backward country), sharpened with a file.

And a pencil for pushing the graft through.

I will of course, blog on the success (or otherwise) of this first attempt at punch grafting.

I am concerned about two things: the first is the strength of the colony and their nectar flow.  It's a hive that swarmed and the new queen failed to materialise.  You need a strong colony to raise queens.  The second is the age of the larvae.  I'm not sure what a three-day-old larva looks like, so I chose the smallest I could see.

I'll check the "finishing colony" in eight days time and report back.

Hors de combat

Son Joe was taking the photos for the previous blog, but didn't wear gloves.

You can see the result below.  Just one sting.

Usually, rubbing some Piriton cream onto the sting immediately reduces the swelling and pain a lot, but in his case, it didn't help much.

But he suffers in a good cause - the edification of my several readers.

Wednesday 20 June 2012

Queen-raising with the punch method

I am attempting to make queens for four queenless hives by using the punch method of removing cells from a prolific donor hive and transplanting them into a queenless hive that will convert them into queen cells.

The photo below shows a super frame with the cells stuck onto the bottom rail using a hot knife and wax.

The next photo shows the donor frame, with holes where the punch has been used to remove the cells.
Now we wait 19 days until the cells are ready for harvesting and use in the queenless hives.  Well, that's the notion.  This is the first time that I have done this, so I am pessimistic.  The cells were hard to handle and I may have damaged them.

If you have used this method, let me know how you got on through the comments button.

Monday 18 June 2012

End-to-end brood on a plastic frame

A plastic frame in a polystyrene hive?  Pretty unnatural, isn't it?  But if it is so unnatural, how come the bees love it?
Here is a photo of a plastic frame that has been layed end to end with brood.
If you are unfamiliar with hives, you need to know that in normal hives, the brood nest is the shape of a rugby ball (for US readers, that's like an American Football, but not quite so pointy).
The queen does not lay eggs close to the edge of the frame because it is too cold.
But a polyhive is so warm that she will.
The following is a 10 second video that shows both ends of the frame.  Even I did not believe it!
The Langstroth format frame is much larger than the normal British Standard frame - although it is a familiar format in mainland Europe and the USA.

A lot of traditional British beeks will be horrified by the polyhive and/or plastic frame.  But it's the way to go.  The plastic frames are virtually indestructible and just need a steam clean and they are ready to go again.  Just roller on some fresh molten wax and you're good to go.

Monday 7 May 2012

Sting the day after


A sting on my chin, photographed the day after visiting the ferocious bees. 

They are usually a bit feisty, but doing the artificial swarm on them sent them mad.

I accidentally put my chin against the veil and they got me.

Photo taken with USB Microscope from Veho.  It has all sorts of uses.

Note to self: must get some of that Grecian 2000.  Do they do it for beards? How come Sean Connery looks good with a beard and I don't?

Artificial Swarm

I successfully completed an artificial swarm last week.

Or so I thought.

The objective is to prevent a colony from swarming - so that you get to keep all your bees and not have half take up residence in someone's chimney.

When you see queen cells being formed, here's what you do:

- find the queen (not easy if she isn't marked and not easy if she is, but slightly easier -- you're looking for one bee in 50,000 at this time of year.  A bit like Where's Wally, only all the faces look the same.)

- when you find the queen, put the frame that she's on in a new hive, with new foundation

- add another frame of brood and a frame of stores to that new hive

- move the original hive (with its inhabitants) to a new position, about (say) 5 metres away.

- put the new hive, now with queen and small retinue, in the old position.

Here's the clever bit.  The flying bees (about half the colony) will go back to the hive in the old position, keeping the queen company and fooling them into thinking that they have swarmed.

The old hive (in the new position -- do try to keep up!) will have nursery bees and the queen cells.  They will raise a new queen from the queen cells.

When you have both hives back to normal, you can either combine the hives to keep your honey production on stream (killing the old queen in the process and keeping the new one), or keep both hives so that you have one more hive next year than you started this year with.

What happened when I did this?

The bees were so ferocious that I forgot to remove a queen cell from the queenright hive and I think they swarmed two days later.  I'm not sure because both hives have lots of bees still.  But the owner of the plot reported "thousands of bees".

I'm going to let them settle down for a week or so and take another peek.


Saturday 5 May 2012

This weather is beyond a joke!

I went to an out-apiary today.  Conditions were not  great -- it was about 10c, but at least the sun was shining and it wasn't raining (for a change).

All the hives are short of stores, and as for filling honey supers -- forget it.

This apiary is sandwiched between two huge fields of Oil Seed Rape (OSR).

Here are the photos.  Can you see what is odd?

See the two bees with the big pollen baskets?  One has orange pollen (source unknown, but I'm sure someone will tell me); the other has yellow pollen typical of OSR.  And many bees have lemon yellow dusting of pollen on their faces that shows they've been in the OSR.

I thought that will such a massive source of pollen and nectar literally metres away, they wouldn't bother with anything else.

But not so.  The books are wrong, or at least, my bees haven't read them.

(Sorry for the out-of-focus photos.  It's hard to get the focus right with a veil on).

Monday 2 April 2012

Changed back to surgical gloves

At first, I used leather gloves.  Then I realised how impractical these are. You can't clean them!
Then I started to use surgical gloves.  But I got stung through them and my hands swelled into bananas.
So I started to use thick rubber gloves.  But I had to clean them after every inspection, and I was squashing a few bees.
So now I have gone back to surgical gloves. I have been stung a couple of time, but I have discovered Piriton tablets. Two of those seems to reduce the swelling and pain quite a lot.
I just discard them after each hive -- good for the bees.
But I also find that I take such great care not to trap a bee (and get stung) that I am treating the bees with greater care, and they are calmer as a result.
Anyone else find this?  What are your preferences?

Now set up for the spring season

In my last post, I wrote that seven hives had made it through the winter.  Having now inspected all the hives, there are only six viable hives.  The seventh, a swarm from June 2011, has weakened and is now queenless.

There are signs of starvation, so it looks like I didn't feed them soon enough.

The best colony is the polyhive with (traditional beekeepers look away now, take a blood-pressure pill) plastic frames.  I have added a super of plastic frames to it.

The Oil Seed Rape in now in flower -- and there are two large fields of it near my out-apiary that has three good hives.  So I'm hoping for a bumper crop.

Thursday 16 February 2012

7 out of 7 hives are alive!

It's a warmish day - about 11c - with light westerly winds and pleasant sunshine.
I noticed that the bees in the three hives in the garden were active, so Mrs Novice and I went on a bike trip around the other hive sites (about a seven mile round trip).

The polyhives on top the containers at the edge of the field are a-buzzin'.  In December when I applied Oxalic Acid (as a varroa treatment), the polyhive with the plastic frames was the most populated - and today it had a thick stream of bees waiting to get back in through the single bee-space that I had allowed them (to keep out wasps, at first, and then mice).

So all is good.  I will give them a feed in a couple of weeks and add in some pollen substitute to encourage the queen to get laying.